Tile Your Way to a Fabulous Floor: The Ultimate DIY Guide With Instructions and Hacks You Won't Believe!
Channel your inner handyman or handywoman so you can take your DIY skills to the next level by tiling your own floor-Read to see how it’s done!
Hey there, DIY enthusiasts! Are you ready to give your space a fresh new look? Well, buckle up, folks, because we're about to dive into the world of tiling! Tiling a floor may seem like a daunting task; but with the right tools, materials, and a little bit of elbow grease, you can transform your space into a worthy paradise.
And whether you're a seasoned DIY pro or a first-time tiler, we've got you covered with all the tips and tricks you need to tackle this project like a boss. So grab your toolkit and let's get tiling!
Preparation
The first step in any tiling project is preparation. You will need to make sure that the subfloor (the layer underneath the tiles) is clean and level. This means that you should remove any old carpet or tile from the area before getting started. Finally, if you are using a cement board as an underlayment, make sure it is firmly attached with screws and not nails.
Laying The Tiles
Now that your subfloor is prepped, it’s time to start laying out the tiles. Start by measuring the length and width of the area you are tiling; and then mark off where each tile goes with chalk lines on both sides of the room.
Once you have done this, begin spreading thin set mortar onto one section at a time using a notched trowel. Then press each tile into place on top of the mortar until it’s fully covered.
When you reach walls or corners, use spacers between tiles for even grouting lines when finished.
Continue this process until all the tiles are laid out in their proper places, making sure to check along the way for any gaps or uneven tiles that may need adjustment.
Make sure to leave at least 1/4 inch gap around all edges so that there's room for expansion when temperatures change or humidity rises later on down the line!
If necessary, trim the edges with a saw blade designed specifically for cutting ceramic tiles before continuing on with grouting and sealing.
Grouting And Cleaning
Once all of your tiles are in place, it’s time to grout! Mix up your grout according to the package instructions and spread it over each section using a rubber float held at a 45 degree angle.
Make sure to push it into every crack between each tile. Otherwise, they won't stick together properly! Use a damp sponge after each section has been filled with grout. This will help remove excess material from the surface of tiles while also evening out grooves between them for an even, finish look.
Everything should dry up completely usually within 24 hours depending on what type of product is used.
Finally, seal up those beautiful new floors with sealer meant specifically for ceramic surfaces. This will help protect the tiles against dirt and water damage in future years.
How To Use Peel And Stick Floor Tiles
So if you're looking for an inexpensive way to give your room a makeover, read on for our step-by-step guide on how to tile a floor using peel and stick tiles.
First, Measure the Room
Before you even think about purchasing any materials or starting the job itself, you'll want to measure the space that needs tiling. This will help you determine how much tile you'll need for the job. Measure both the length and width of the room (in feet), then multiply these two numbers together. This will give you the total square footage of your floor.
Choose Your Tile And The Amount
Once you've calculated your total square footage, head over to your local home improvement store or search online for the appropriate products. Consider factors such as color and pattern before making your selection.
It’s important to calculate the number of tiles that are necessary for the project, and determine whether there will be any half or partial tiles needed to fill in small gaps along any of the sides.
Prepare Your Subfloor
Before laying down any tiles, it’s important to properly prepare the subfloor so that it's level and free from dirt and debris. If necessary, patch any cracks in the existing substrate. Use sandpaper or a sander to smooth out any bumps; vacuum up any dust or dirt particles; then clean the area with soapy water before you begin to tile.
Lay Down The Tile
To properly lay peel-and-stick tile, start by placing rows of tiles without removing the protective backing. This allows you to visualize the installation and plan the appropriate layout for the project. Determine where half or partial tiles should be placed and try to position them in less noticeable areas.
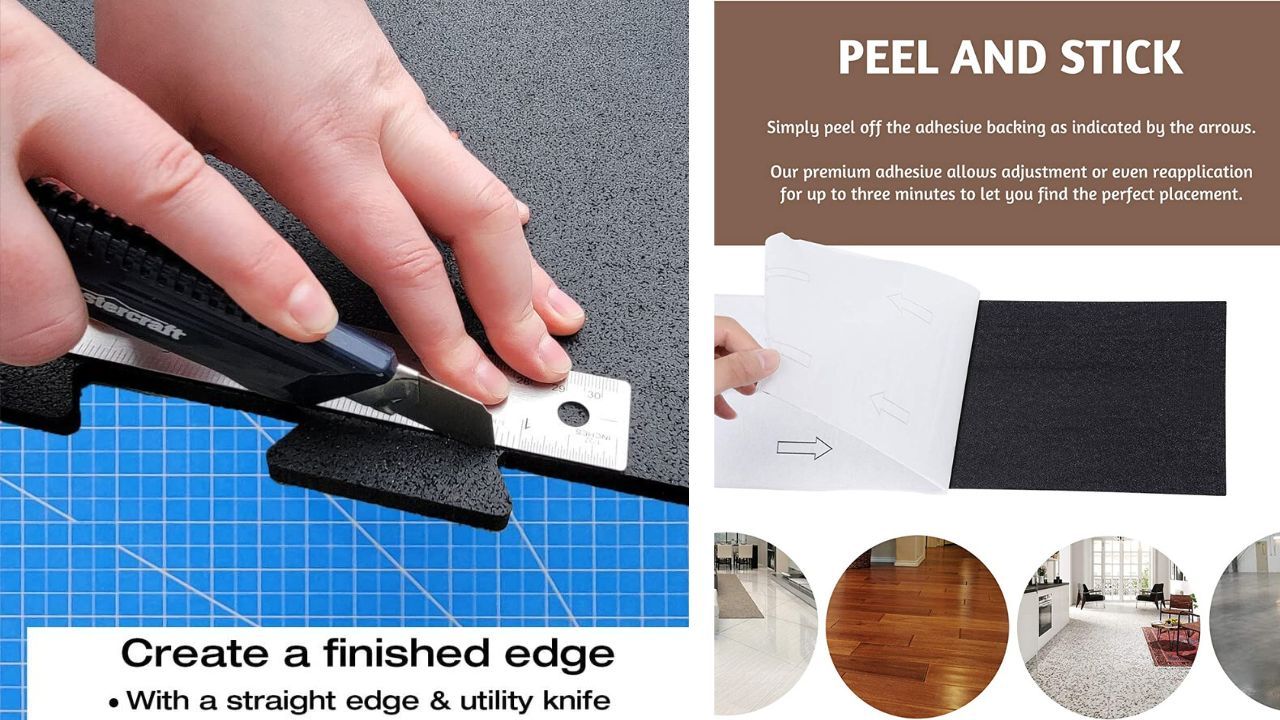
Once the surface area for the floor has been measured and you can visualize everything, divide the floor into quadrants or into different sections. Then cut the tiles to the right size where necessary using a sharp utility knife or tile scissors. Remember to work with one section at a time.
When applying the tiles, it's recommended to only peel half of the backing paper. The backing paper has arrows that indicate the direction in which the tile should go. Ensure that all tiles are installed in the same direction to get the best results.
To expose the entire back and ensure that the tile lays flat against the floor, keep removing the paper as the edge touches the surface. Stick the tiles in the right spot and direction according to the plan, and the outcome should match your intentions!
Invest In Extra Floor Tiles
Investing in extra tiles is always a wise decision. Keeping about five percent more tiles than required can ensure that the color and pattern will match the existing tiles. If any tiles get ripped off, cracked, chipped or damaged; you will have extra tiles to replace them.
Replacing A Damaged Tile
If newly installed tiles become loose, chipped or broken, it is recommended to replace them as soon as possible. However, removing the tiles can be challenging due to the strong adhesive attached to the back.
Applying gentle heat to each tile using a heat gun or hair dryer can help prevent damage to the floor behind the tiles. The heat increases the tile's flexibility, allowing the adhesive to loosen, making it easier to remove the peel-and-stick tile. Try to gently peel the damaged tile off and prepare the surface for installing a new tile.
If the adhesive is stubborn, a putty knife can be used to break through it without damaging the floor's surface. However, the remaining adhesive must be sanded or scraped from the surface before the new tile can be laid.
Usually, small patches can be completed without having to move or reassembling the surrounding tiles. However, it is important to ensure that the replacement tile is facing the correct direction to blend in seamlessly with the existing pattern.
So there you have it, folks! Tiling a floor might seem like a daunting task, but with these simple steps, anyone can lay down their own beautiful new floors without having to call in professionals; and they can save time and money while still achieving great results!
So whether you're a seasoned DIY-er or a newbie to the game, just remember: measure twice, cut once, and don't be afraid to get a little dirty. And hey, once you're done, you can sit back, relax, and bask in the glory of your newly tiled masterpiece. Happy tiling, friends!
However, if you do not know which tile to choose click the button below to see what tiles that we have reviewed for you on Amazon so that you can get started transforming your home into something special today!